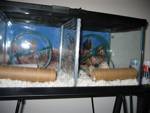
Build a Secure Split Tank


The tank above is my favorite split tank. It is secure, has a hinged lid (for interaction with one gerbil at a time), and is easy to build.
When introducing two gerbils to each other, you should always use the split-cage method. The basic idea is to let the gerbils see and smell each other but prevent them from injuring each other in the meantime. Gerbils are very territorial and will attack strangers, usually fighting to the death. Read more about using the split-cage method in the Split-Cage Introductions Tip and in the AGS (American Gerbil Society) Handbook.
There are many ways to build a split tank. Suzie liked to run up and over dividers, so I ran the risk of her getting Samantha every time I removed the lid to feed or play with one of them. When I saw aluminum channel at the hardware store and a hinged lid at the pet shop, I got an idea. The result is Twin Squeaks' split tank. It prevents escapes, has an easy-to-remove divider, is sturdy, and lets you feed and hand-tame one gerbil at a time.
Others have modified this original design, creating tanks that meet their own needs. You can see a couple of these variations at the links below:
How To Build The Split Tank

In this photo, you can see how the aluminum channel is attached to the side of the tank. It serves as both a guide and an anchor for the removable hardware-cloth divider.
You will need the following materials to build your own split tank:
|
- aluminum channel
- non-toxic aquarium sealant
- 1/2- or 1/4-inch hardware cloth
- tin snips
- hinged tank lid
- tank-lid clamps
|
First, measure the width of the bottom of the tank and the height of the sides of the tank. Next, go to your local hardware store and find a length of aluminum channel. Click here to see a photo of aluminum channel. The piece I got was 4 feet in length. A store employee trimmed it into three measured pieces for me. For a 15-gallon tank, you will need one 11.5-inch piece (for the floor of the tank) and two 11-inch pieces (for the sides of the tank).
Follow the instructions on the package of aquarium sealant. (Non-toxic aquarium sealant is safe for gerbils, as long as you give it time to cure and dry.) Use the sealant to attach the three pieces of aluminum channel to the sides and bottom of the tank. I taped each to the side with masking tape to help hold them in place while the sealant cured. If you find that the inner edge of the plastic tank rim gets in the way of sliding the aluminum channel down along the sides, use your tin snips to cut a small notch out of the plastic rim.
After 5-10 minutes, you can use a small razor edge (or similar tool) to trim off any excess sealant. Wait at least 48 hours before doing any more work on your split tank. Aquarium sealant gives off a vinegar-like odor while it is curing. Make sure you don't smell it anymore before you let your gerbils move into the tank.
Finishing The Tank
A few days after you apply the non-toxic aquarium sealant, you can finish building the split tank. If you used masking tape to secure the aluminum channel, remove it.
Use the tin snips to trim the hardware cloth so it slides down into the side pieces of aluminum channel. It should fit down into the bottom piece of aluminum channel and should come up to the top edge of the tank when inserted into the tank.

Samantha and Suzie check out the split tank.
When trimming the hardware cloth, err on the side of cutting it too large, as it is better to have hardware cloth that fits snuggly into the aluminum channel than to have a loose fit that gerbils can pry loose.
Place the hinged lid on the tank. I used these hinged lids. Click here to see the lid opened. You can see that you could handle one gerbil and keep the other gerbil safely on his or her half of the tank. Make sure you secure the tank lid with lid clamps.
When you are ready to introduce gerbils, you can slide the hardware cloth out of the tank. You can also remove the hardware cloth for easier tank cleaning.
| 
